
| 일 | 월 | 화 | 수 | 목 | 금 | 토 |
|---|---|---|---|---|---|---|
| 1 | 2 | 3 | 4 | 5 | 6 | 7 |
| 8 | 9 | 10 | 11 | 12 | 13 | 14 |
| 15 | 16 | 17 | 18 | 19 | 20 | 21 |
| 22 | 23 | 24 | 25 | 26 | 27 | 28 |
- 통영예쁜카페
- 국가직
- 뚝섬역맛집
- 공무원
- JavaScript
- npm
- 한남동맛집
- 스페인여행
- 한성대맛집
- 꼴뚜기회
- 방이편백육분삼십
- ELK
- 영화추천
- 방이편백육분삼십성신여대
- 성신여대편백집
- 통영
- 통영여행
- tomcat7
- 돈암동맛집
- 자바스크립트에러처리
- 퇴사후공무원
- ubuntu자바설치
- react
- 성북구맛집
- 서울숲누룽지통닭구이
- 통영에어비앤비
- springboot
- 성신여대맛집
- gradle
- 파이썬
- Today
- Total
코린이의 기록
[Spring Boot] SSO(Single Sign On), Scalable Authentication Example with JSON Web Token (JWT) and Spring Boot 본문
[Spring Boot] SSO(Single Sign On), Scalable Authentication Example with JSON Web Token (JWT) and Spring Boot
코린이예요 2018. 5. 3. 10:32이번 포스팅에서는 Spring Boot와 JSon Web Token(JWT), Single Sign On(SSO)를 이용하여 확장가능한 인증에 대한 과정에 대하여 다룬다. JWT 기반의 SSO는 데이터베이스에 접근하지 않고도 유저를 인증할 수 있다. JWT는 Cookie와 Session의 대안으로 만들어진 정보 교환 방식으로 "크로스 도메인 쿠키 문제"에 대안으로 사용될 수 있다. 즉 Cookie같은 경우에는 발행한 해당 서버에서만 유효하지만, 토큰은 HTML Body형태로 전송하기 때문에 다른 도메인에서도 사용할 수 있다.
샘플 소스
아래 Github에서 소스를 다운로드 받는다. 왜 두가지 소스를 받는지에 대해서는 아래에서 설명한다.
- Authentication Service : https://github.com/hellokoding/single-sign-on-out-auth-jwt-cookie-redis-springboot-freemarker.git
- Resource Service : https://github.com/hellokoding/single-sign-on-out-resources-jwt-cookie-redis-springboot-freemarker.git
Keywords
- Json Web Token(JWT) : JSON 포맷을 이용한 Web Token으로 기본 구조는 Header, Payload, Signature로 나뉜다.
JSON ex.
header
'{"alg":"HS256","typ":"JWT"}' |
payload
'{"loggedInAs":"admin","iat":1422779638}' |
signature = Signature는 header와 playload를 base64로 인코딩 후 합쳐진다.
key = 'secretkey' unsignedToken = encodeBase64Url(header) + '.' + encodeBase64Url(payload) signature = HMAC-SHA256(key, unsignedToken) |
JWT ex.
token = encodeBase64Url(header) + '.' + encodeBase64Url(payload) + '.' + encodeBase64Url(signature)
-> eyJhbGciOiJIUzI1NiIsInR5cCI6IkpXVCJ9.eyJsb2dnZWRJbkFzIjoiYWRtaW4iLCJpYXQiOjE0MjI3Nzk2Mzh9.gzSraSYS8EXBxLN_oWnFSRgCzcmJmMjLiuyu5CSpyHI
JWT는 마침표(.)를 구분자로 이용하여 header,payload,signature를 합친다.
- Claim based Token : Claim이란 사용자에 대한 속성을 의미하는데, JWT는 이 Claim을 JSON값으로 정의한다.
JWT에 대한 자세한 설명은 아래 링크를 참고한다.
https://velopert.com/2389
http://sanghaklee.tistory.com/47
https://www.joinc.co.kr/w/man/12/jwt
JWT 인증 과정
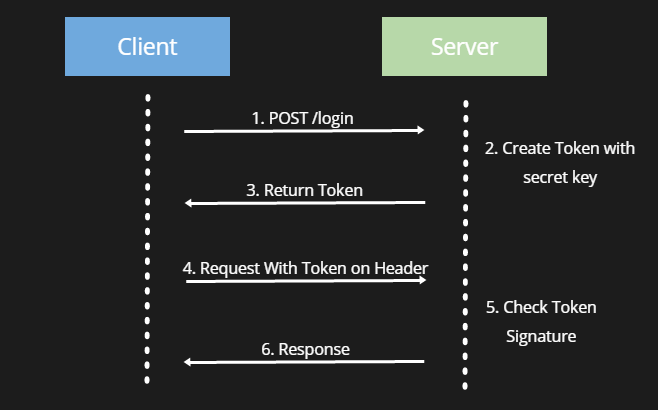
1. POST API로 Server에 로그인을 시도한다.
2~3. Server에서는 Secret key로 Token을 생성하여 Client에 반환해준다.
4. Client는 Header에 있는 Token으로 요청한다.
* Client에서는 도대체 JWT Token을 어디에 보관하나?
방법 1. HTML5 web storage
방법 2. Cookies
참고 : http://lazyhoneyant.tistory.com/7
5~6. Server에서는 Client로부터 전달받은 Token을 검사한 후 이애 대한 Response를 Client로 전달해준다.
Prerequisite
- JDK 1.7+
- Redis
* 해당 프로젝트는 Redis로 Login이 수행되기 때문에 사전에 Redis server가 실행되어야 한다.
- Maven 3+
Stack
Java
Single Sign On
Single Sign Out
JSON Web Token
Redis
Cookie
Spring Boot
FreeMarker (.ftl)
Redis Server 설치 및 실행
Redis란?
레디스(Redis)는 Remote Dictionary Server의 약자로서 ‘키-값’ 구조의 비관계형 데이터를 저장하고 관리하기 위한 NoSQL의 일종이다. 2009년 Salvatore Sanfilippo가 처음 개발했다. 2015년부터 Redis Labs가 지원하고 있다. 모든 데이터를 메모리로 불러와서 처리하는 메모리 기반 DBMS이다. BSD 라이선스를 따른다. DB-Engines.com의 월간 랭킹에 따르면, 레디스는 가장 인기 있는 키-값 저장소이다.
Redis 설치
windows 및 linux 환경에 맞게 설치한다.
Windows 64bit에서 설치
Redis는 공식적으로 Windows를 지원하지 않지만, Microsoft Open Tech 에서 64bit 기반으로 포팅하여 개발 및 유지보수를 하고 있다. 아래 GitHub 에서 다운로드 받아 Redis를 설치하도록 한다.
https://github.com/MicrosoftArchive/redis/releases
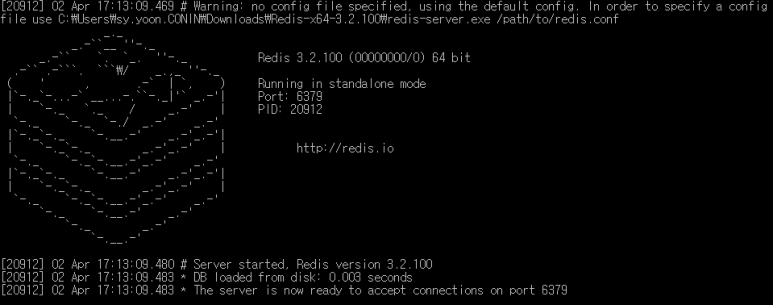
Redis 실행
redis-server.exe 를 실행시킨다.
Redis Server 실행 화면
Authentication Service
인증 서버에서는 인증 및 토큰 발행을 해주는 서비스를 제공한다. 로그인이 성공하면 유저 정보를 포함한 JWT 토큰을 발행해준다.
pom.xml
해당 프로젝트에서 필요로 하는 freemarker, Java, Spring Boot, JsonWebToken, Redis를 설정하였다. jedis는 Java에서 redis를 쉽게 사용할 수 있도록 해주는 라이브러리이다. Jedis에대한 내용은 아래 링크를 참고한다.
http://jeong-pro.tistory.com/140
login.ftl
아래 로그인 화면을 나타내는 freemarker 템플릿이다. usesrname과 password를 입력하면 POST method로 ${RequestParameters.redirect!} URL로 redirection 된다. 여기서 RequestParameters.redirect!는 http://localhost:8080/login?redirect=http://localhost:8180/protected-resource 에서 redirect 할 URL = http://localhost:8180/protected-resource 를 의미한다. "Log In" 버튼을 클릭하면 form이 controller로 전송된다. (MVC)
login.ftl form에서 username, password, redirect가 controller로 전달됨.
LoginController.java
line 22 : @RequestMapping 어노테이션으로 "/" URL 패턴으로 request하면 home() 메소드를 호출하게 된다.
line 24 : /login 으로 리다이렉션된다.
line 27 : @RequestMapping 어노테이션으로 "/login" URL 패턴으로 맵핑된 login()메소드를 호출하게 된다.
line 29 : controller에서 "login"과 같이 string을 리턴하는 경우 view 가 호출된다. (login 화면이 나옴)
line 32 : client(view) 에서 POST로 전송한 form을 받는다. value는 url 패턴을 의미함
line 35 : view에서 전달받은 username, password값이 유효한지 확인한다.
line 40 : 유효한 값을 받았다면 Token을 생성한다. JwtUtil.java 에서 generateToke 메소드를 참고한다.
line 41 : Cookie를 생성한다. CookieUtil.java에서 create메소드를 참고한다.
line 43 : redirect: url로 이동한다.(http://localhost:8180/protected-resource) or (http://localhost:8280/protected-resource)
JwtUtil.java
JWT를 사용하여 JWT Token을 생성하고 파싱한다.
line 13 : loginController.java에서 전달받은 signingKey와 subject로 Token을 생성하는 메소드
line 18: subject를 set한다. 여기서 subject는 username이다.
line 19 : jwt 발행 시점을 set한다.
lien 20 : 서명 알고리즘과 서명 키를 set한다. 여기서 사용된 서명 알고리즘은 HS256 알고리즘을 사용하였고 서명 키는 "signingKey" String으로 사용하였다.
line 22 : 실제로 JWT를 빌드하고 JWT Compact Serialization 규칙에 따라 압축 된 URL-safe 문자열로 직렬화 한다.
JTW Builder API : http://javadox.com/io.jsonwebtoken/jjwt/0.4/io/jsonwebtoken/JwtBuilder.html
line 24 : Jedis-Redis에 key ("active-subjects"), value (username) 를 add?? 뭔지는 모르겠지만 일단 add한다. (RedisUtill.java에서 sadd 메소드 참고)
CookieUtil.java
JwtUtil에서 생성한 Token으로 Cookie를 생성한다.
line 11 : name, value(token값)로 cookie를 생성한다. (name : "JWT-TOKEN")
11에서 생성 된 cookie의 attribute들을 set한다.
line 12 : false
line 13 : true
line 14 : -1
line 15 : localhost
line 16 : "/"
line 17 :
Cookie API : https://docs.oracle.com/cd/E17802_01/products/products/servlet/2.1/api/javax.servlet.http.Cookie.html
RedisUtil.java
간단한 테스트 진행을 위해 user database로 HashMap(credentials)를 사용한다.
WebApplication.java
Resource Service
서비스를 제공한다.
pom .xml
- Authentication Service와 동일하므로 생략.
CookieUtil.java
JWT Token은 브라우저 쿠키를 저장 및 추출한다.
- Authentication Service와 동일하므로 생략.
JwtUtil.java
JJWT를 사용하여 JWT Token을 생성하고 파싱한다.
- Authentication Service와 동일하므로 생략.
JwtFilter.java
JwtFilter는 SSO를 수행한다. JWT Token이 존재하지 않으면 (인증되지 않음) 인증 서비스로 리다이렉션 된다. JWT 토큰이 존재하면 (인증 된) 사용자 ID를 추출하고 요청을 전달한다.
Spring OncePerRequestFilter : https://docs.spring.io/spring/docs/current/javadoc-api/org/springframework/web/filter/OncePerRequestFilter.html
ResourceController.java
WebApplication.java
application.properties
protected-resource.ftl
How to Run
- Authentication Service
> mvn clean spring-boot:run
- Resource Service
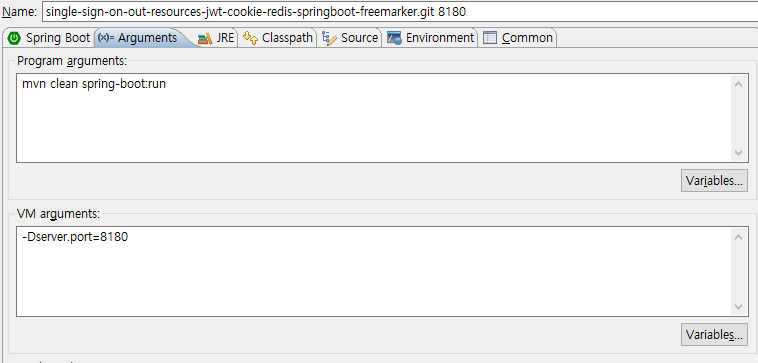
> mvn clean spring-boot:run -Dserver.port=8180
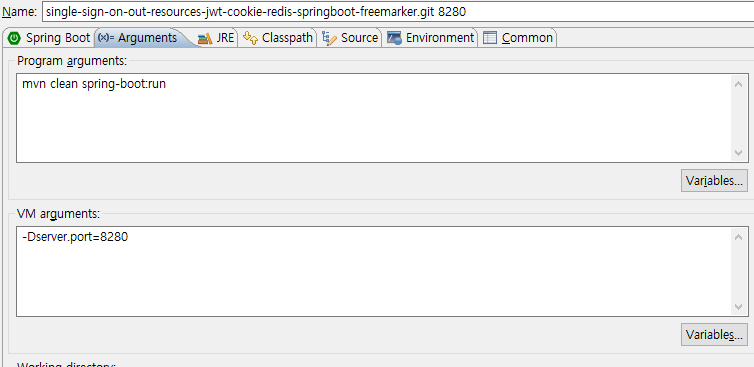
> mvn clean spring-boot:run -Dserver.port=8280
Eclispe > Run > Run Configurations
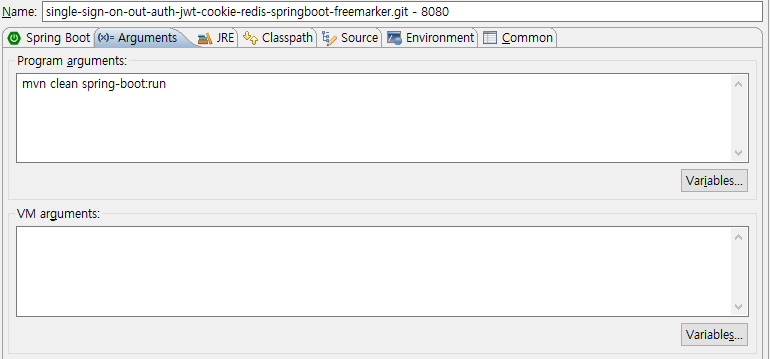
아래 그림과 같이 Spring Boot App에 총 3개의 App을 설정해준다.

port 8080
port 8180
port 8280
결과 화면
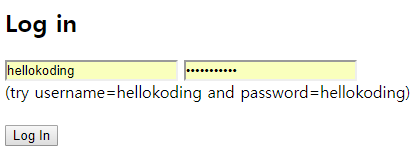
1. 로그인 화면
하드 코딩된 credintials 계정 정보로 로그인한다. (hellokoding/hellokoding) , (hellosso/hellosso)
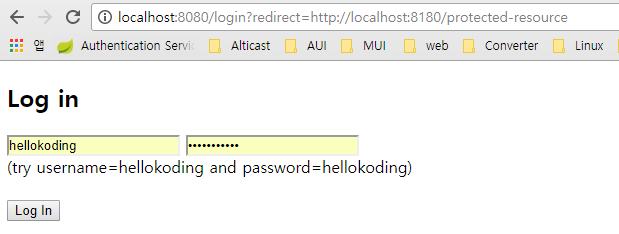

2. 로그인 후 redirect된 화면 (port number : 8180)
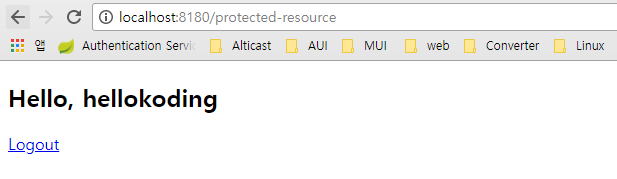
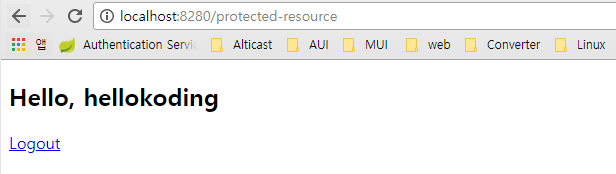
3. port를 8280으로 바꿔서 접속한다 ( 다른 도메인 접속 )
TO DO LIST (기존 프로젝트에 위 JWT 기능을 추가 시키기 위해서)
Spring boot -> Spring
Freemarker -> JSP
Redis -> MySQL??
참고 문헌 : https://hellokoding.com/hello-single-sign-on-sso-with-json-web-token-jwt-spring-boot/
'Framework > Spring' 카테고리의 다른 글
| [Spring] Spring 4 - 스프링 AOP(Aspect Oriented Programming) 구현 (0) | 2018.05.03 |
|---|---|
| [Spring] Spring 4 - 의존 자동 주입 (0) | 2018.05.03 |
| [Spring] Spring 4 - 스프링 DI와 예제 프로젝트 (0) | 2018.05.03 |
| [Spring] Spring 4 - Maven 프로젝트 생성 (0) | 2018.05.03 |
| [Spring Boot] Spring Boot 시작하기 (0) | 2018.05.03 |